
Craft by Mary, staff member, Halifax Central Library
Tom Nook is the most adorable raccoon...dog...raccoon dog. Make your own Tom Nook with this simple craft tutorial.
Sewing skills
This craft requires basic hand-sewing skills. While we won't go deep into the details here, we will include some helpful sites to get you started.
The easiest way to sew this project together is with a Whipstitch, opens a new window which can be used to appliqué a small piece of material on top of a larger piece, or to join the edges of two pieces of material together. A good instruction video for this stitch can be found here.


Supplies:
- Scissors
- Needle and thread
- Stuffing
- Felt in 5 colours:
- tan
- brown
- blue
- white
- pink
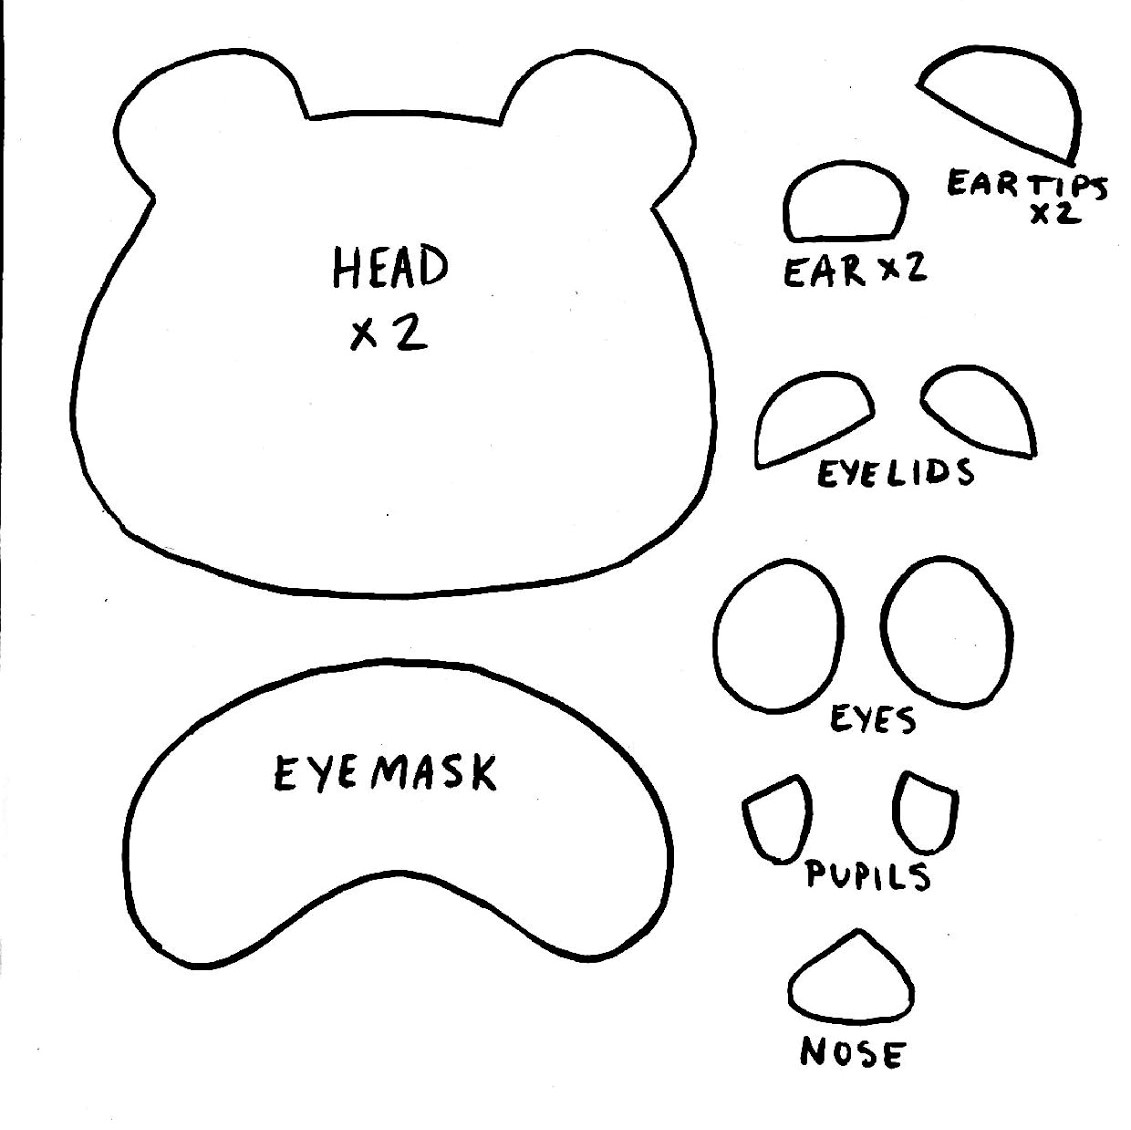
- Tom Nook Pattern (click to download)
If you don’t have these supplies use whatever you have! Fabric instead of felt. Scraps of felt or fabric for stuffing. Even cut out the shapes from paper and layer them for a paper craft.
Step 1: Print or trace the pattern
Use the pattern to cut out the shapes in the following colours:
Head and Eyelids: Tan
Eye mask, ear tips, and nose: Brown
Eyes: White
Pupils: Blue
Ears: Pink

Above are all the pieces you should have and how they are layered to create Tom Nook.
Step 2: Assemble
Make sure you sew the pieces together in the right order.
- Attach the eyes, pupils, and eyelids to the eye mask.
- Make sure the eyelids cover all of the white at the top of the eye.
- Next, attach the ear tips, ears, and nose to one of the head pieces.
- Sew the eye mask in place on the front head. Tom Nook’s face is now done and he’s starting to look like the loan shark we all know and love.
- Line up the back head piece with the finished front and sew along the edge to connect the two pieces.
- Leave a gap of at least two inches to add stuffing.
- Now add stuffing, or the scraps of felt that you have left from cutting out your pattern. You can use a pencil or something similar to push the stuffing into the ears if you are having trouble.
- Finally, Sew up the remaining hole and your Tom Nook felt stuffie is complete!


We would love to see your cute little creations. Share it with us on social media @hfxpublib, or post a comment here and tell us how it went.

Add a comment to: Tom Nook From Animal Crossing – Craft Tutorial